Workable Steps to Set up Maven in Eclipse
Tested on Windows 10, in Eclipse Neon/Eclipse Neon.1 (the version for Java EE developers), using Maven 3.3.9 (externally installed, not the embedded one in Eclipse)
First download Maven and follow the installation steps on TutorialsPoint.
Then, go to the M2_HOME directory. In my case, it is D:\apache-maven-3.3.9. Open the settings.xml in the conf/ directory. We need to overwrite two default settings. One is for Maven repository, or simply called repo, the other is about the default jdk for compilation.
If you live in China, it is highly recommended that you use a reliable Maven mirror whose server is physically located in China. Because lots of sites are blocked and most of the unblocked ones are really slow. The following one is maintained by Alibaba. I’ve used it for quite a while. It works pretty good, at least for the moment this post is written.
Add the following piece of xml code under the <mirrors> element.
|
|
Change the default compiler to the version of the jdk you are using (default is 1.5 if you do not have this configured). In my case, I use jdk-1.8.
Add the following piece of xml code under the <profiles> element.
|
|
Then, we need to configure Maven in Eclipse.
- In the Eclipse menu, click “Window” and select “Preferences”
- Expand the tag “Maven” and select “Installations”
- Click “Add…” button to the right. In the poped up “New Maven Runtime” dialog window, choose the “External” installation type and specify the installation home for Maven. (In my case, the installation home is
D:\apache-maven-3.3.9) - Click “Finish”
- Back to the “Preference” dialog window, in the “Select the installation used to launch Maven”, select the external maven installation you’ve just added. (Not the “EMBEDDED” one or “WORKSPACE” one)
- Click “Apply”
- Back to the “Maven” tag to the left, select the “User Settings” sub-tag. Specify the setting file we’ve just modified for both “Global Settings” and “User Settings”. In my case the path of the file is
D:\apache-maven-3.3.9\conf\settings.xml. The “Local Repository” should stay default, unless you’ve changed the path of your local maven repository. - Click “OK”
For now, we have done the installation and configurations. Let’us move on to the core topic of working with Maven in Eclipse IDE.
For day-to-day development, two common projects we use are “Java Project” for Java SE development and “Dynamic Web Project” for Java Web development. So, the question is how to incorporate the two kinds of Eclipse projects into their respective Maven projects without sacrificing the day-to-day development workflow in the Eclipse projects that you are familiar with.
Let’s deal with the “Java project” first.
- In the Eclipse menu, click “File”, select “New”, and choose “Others…”
- In the pop-up window, type “maven” in the “type filter text” search bar, then select “Maven Project” and click “Next >”
- Check the “Create a simple project (skip archetype selection)” checkbox. Click “Next >”
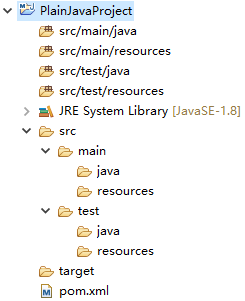
- Specify the artifact for your project. In my case, the group ID is “io.github.accessun” (my blog site in reversed order), the artifact ID is “PlainJavaProject”, the version number is “0.0.1-SNAPSHOT”, the packaging is “jar”. And just leave other fields empty. Then click “Finish”
Alright, done! You can see both the Eclipse source folders and real directory structure in the Project Explorer. Go edit your pom.xml and write some Java code!
It is a little bit tricky and odd of the way to set up Maven project for Java web development in Eclipse. The followings are the steps:
- In the Eclipse menu, click “File”, select “New”, and choose “Others…”
- In the pop-up window, type “maven” in the “type filter text” search bar, then select “Maven Project” and click “Next >”
- Check the “Create a simple project (skip archetype selection)” checkbox. Click “Next >” (Yeah! Do trust my again this time! Select this option even for Java web projects. You can experiment with the archetype selection. I did that. But… the resulted setup turns out to be weird. I don’t know why. Maybe this is the Eclipse way, huh?)
- Specify the artifact settings for group ID, artifact ID, and version just like the above settings for Java project. However, this time you should select “war” for the “Packaging” selection. This indicates that this Maven project is a Java web project.
- Click “Finish”
- You’ll notice that there is an error symbol on the project. Don’t panic. This is expected. Right click on the project in the Project Explorer. Then, choose “Properties”.
- Choose “Project Facets” to the left. Uncheck the “Dynamic Web Module”. Click “Apply”
- Check the “Dynamic Web Module” again. Then there will be a link called “Further configuration available…” appear below. Click on it.
- In the popup window, change the “Content directory” from “WebContent” to “
src/main/webapp“. Check the “Generate web.xml deployment descriptor” option. Click “OK”. Click “OK” again.
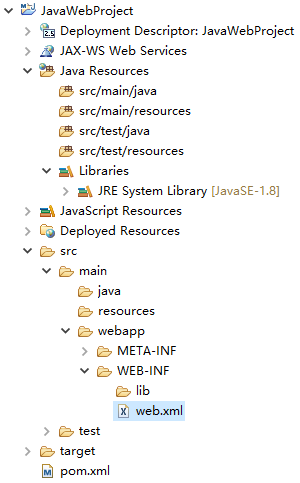
Now, we have the basic setup of a Maven project for Java web development in Eclipse. The “src/main/webapp“ directory is equivalent to the “WebContent” directory in a “Dynamic Web Project” of Eclipse. You can see the web.xml file in the “WEB-INF” directory.
Another thing that should be mentioned is that the auto generated web.xml in the settings above is based on web-app version 2.5:
|
|
Changed it to the new 3.1 version if you like. Just copy and replace the code below. This 3.1 version code is auto generated by Eclipse for the “Dynamic Web Project”. So you can safely use it.
|
|
The final thing that I would also like to mention is that if you create jsp file in the webapp directory, you’ll probably get an error saying that “The superclass javax.servlet.http.HttpServlet was not found on the Java Build Path”. This is because you haven’t specify the servlet and JSP dependencies for Java web development. Just open the pom.xml file and add the following two dependencies under the <dependencies> element. Note that the scope should be set to provided since if you give them a compile scope, the two dependencies will be added to your compiled project. This may cause a collision with the servlet and JSP APIs provided by the servlet container, say Tomcat. provided ensures that the two dependencies are only effective when needed during the development process. After deployment, the corresponding APIs from the actual container is used instead.
|
|
Alright. Now we have our topic covered. Happing coding!
